Thursday, November 6, 2014

Pumpkin Spice Cheesecake Swirled Brownies


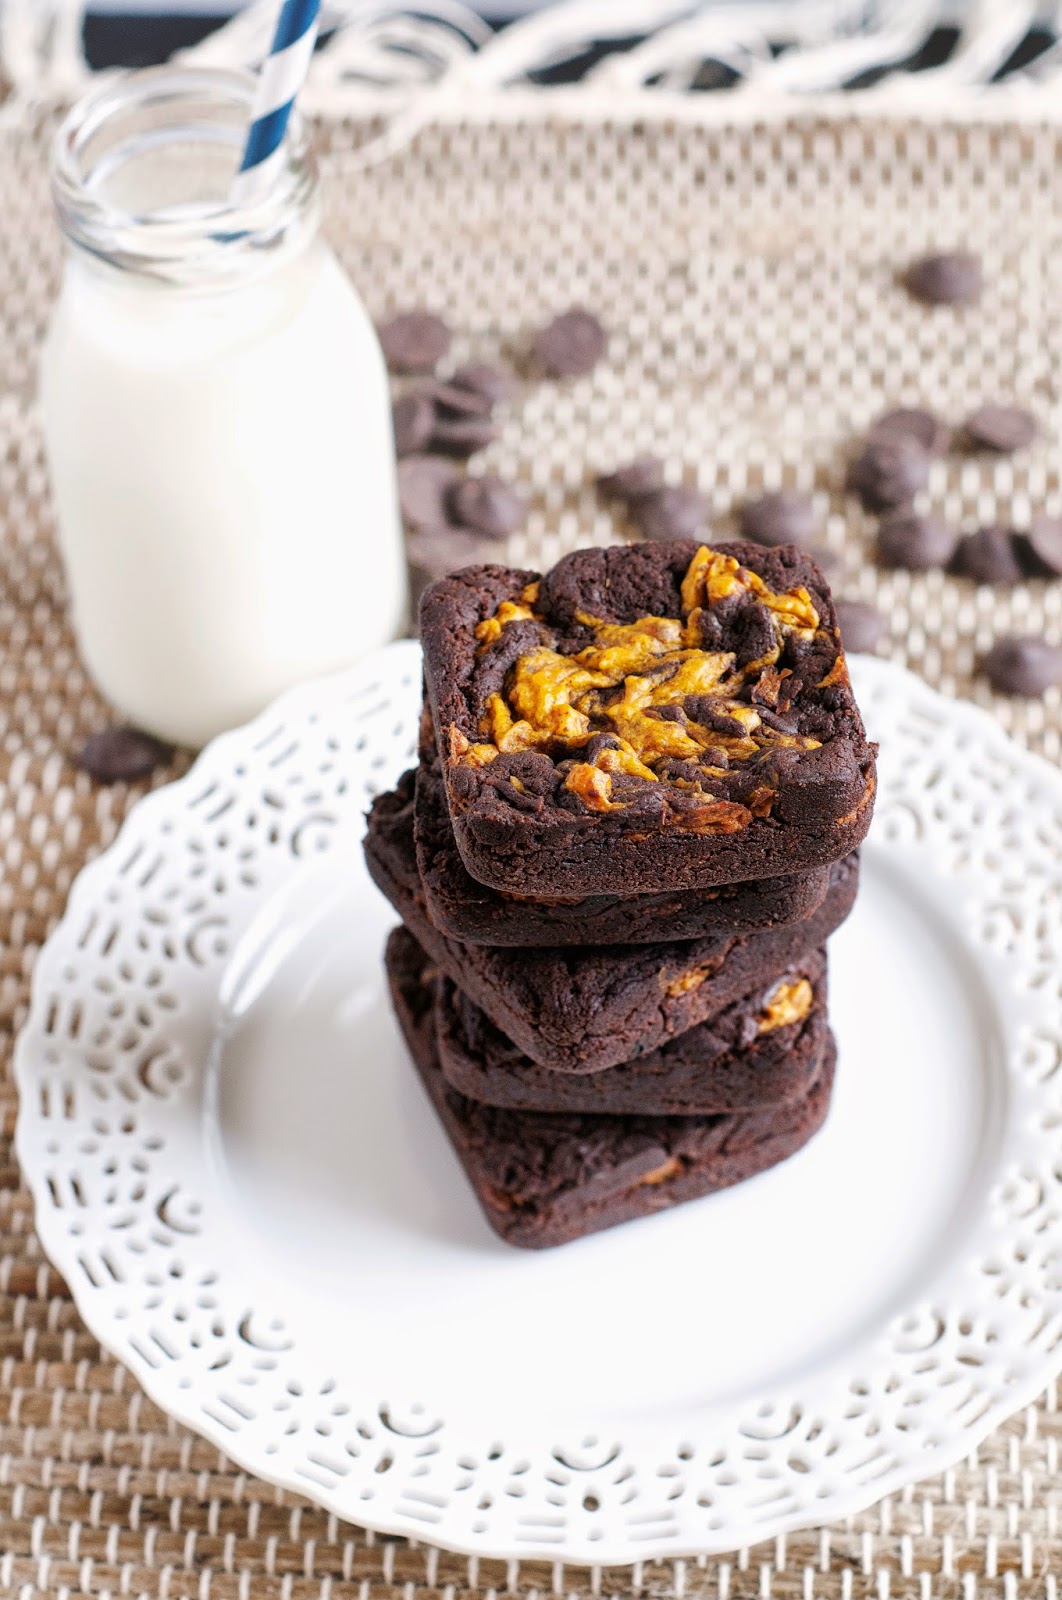
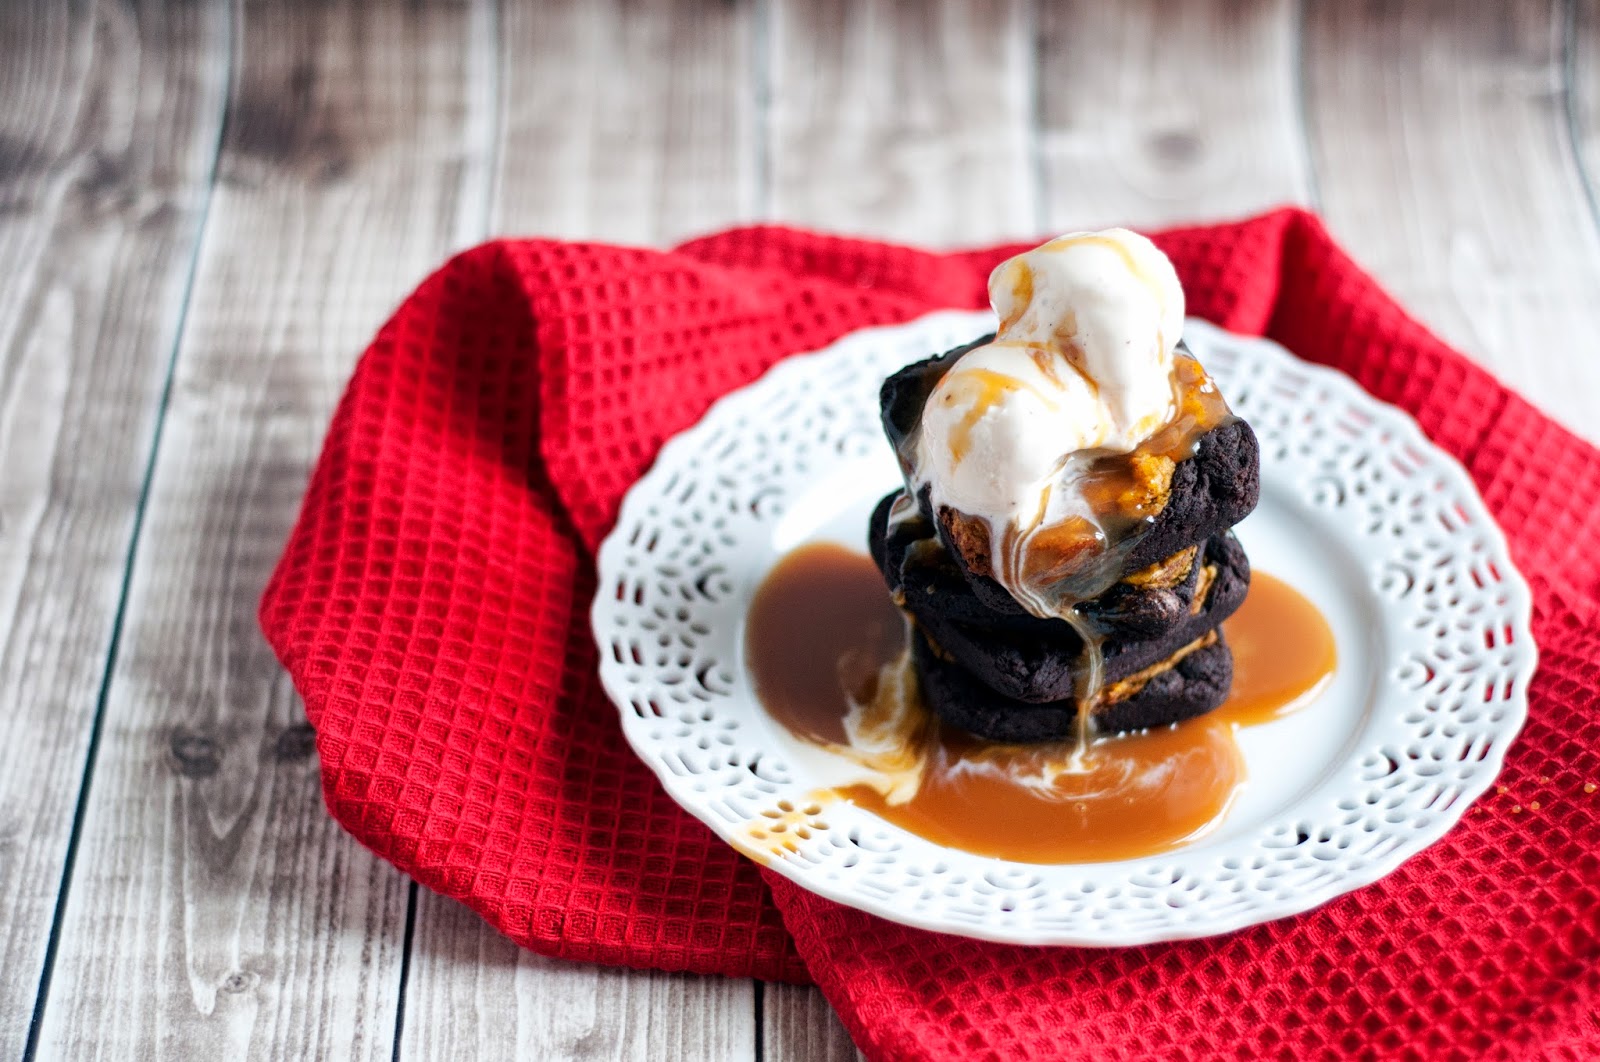
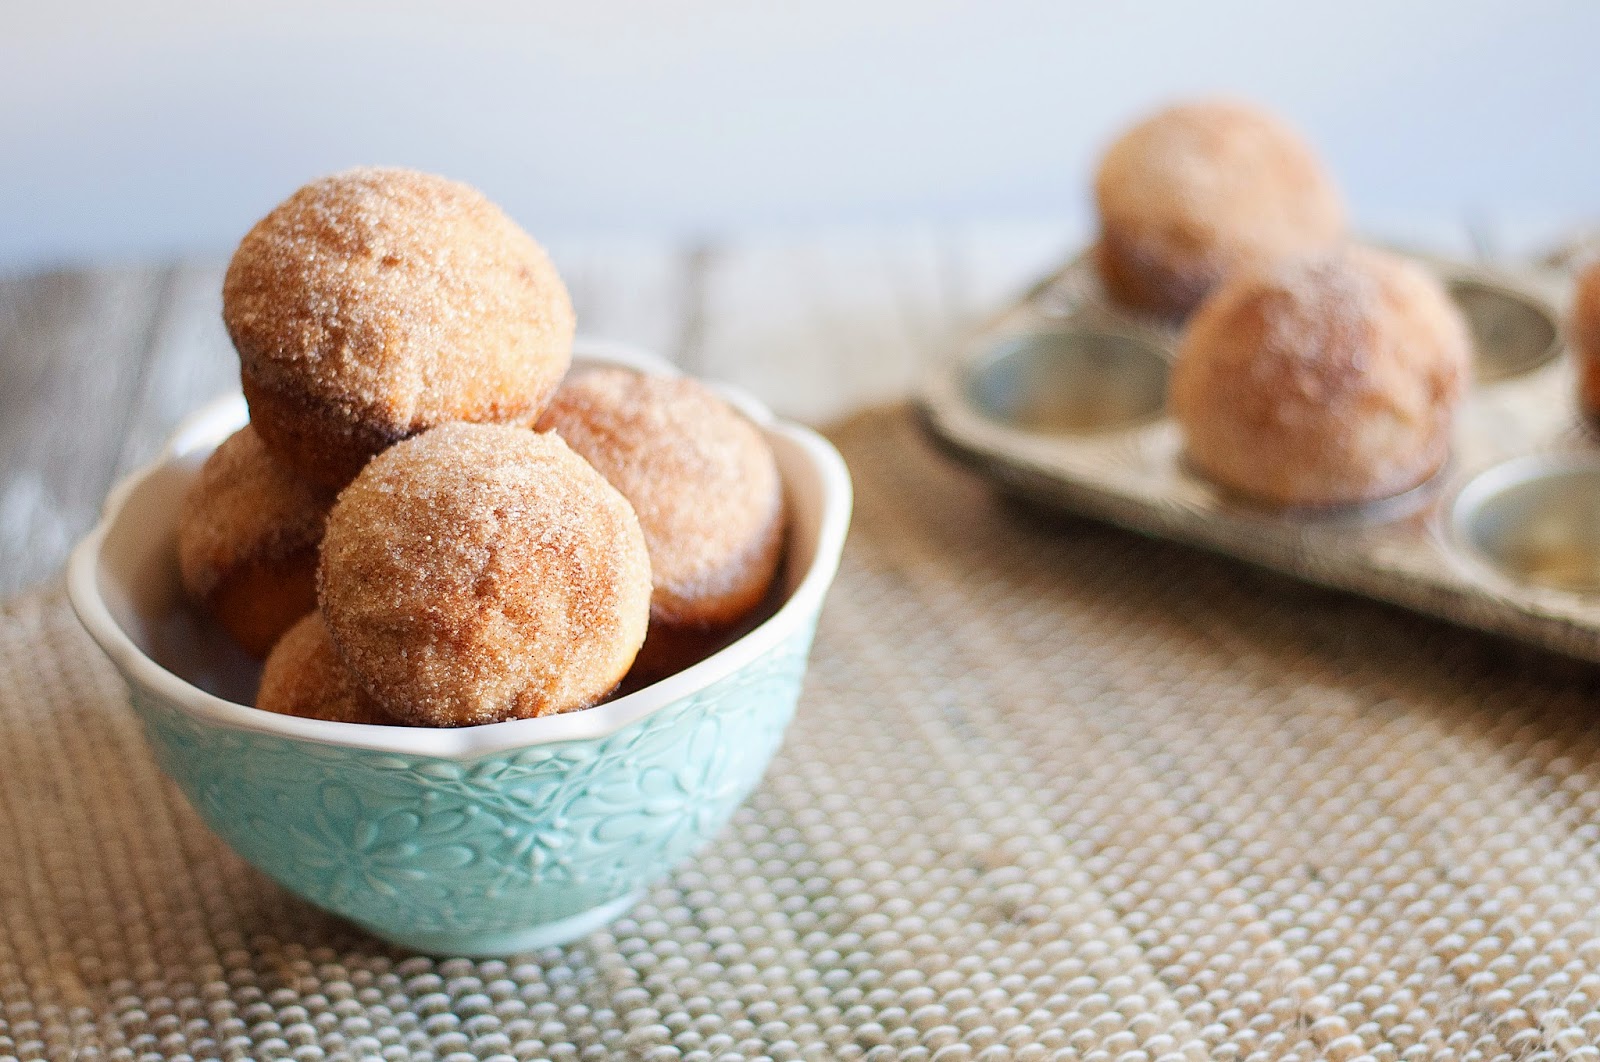
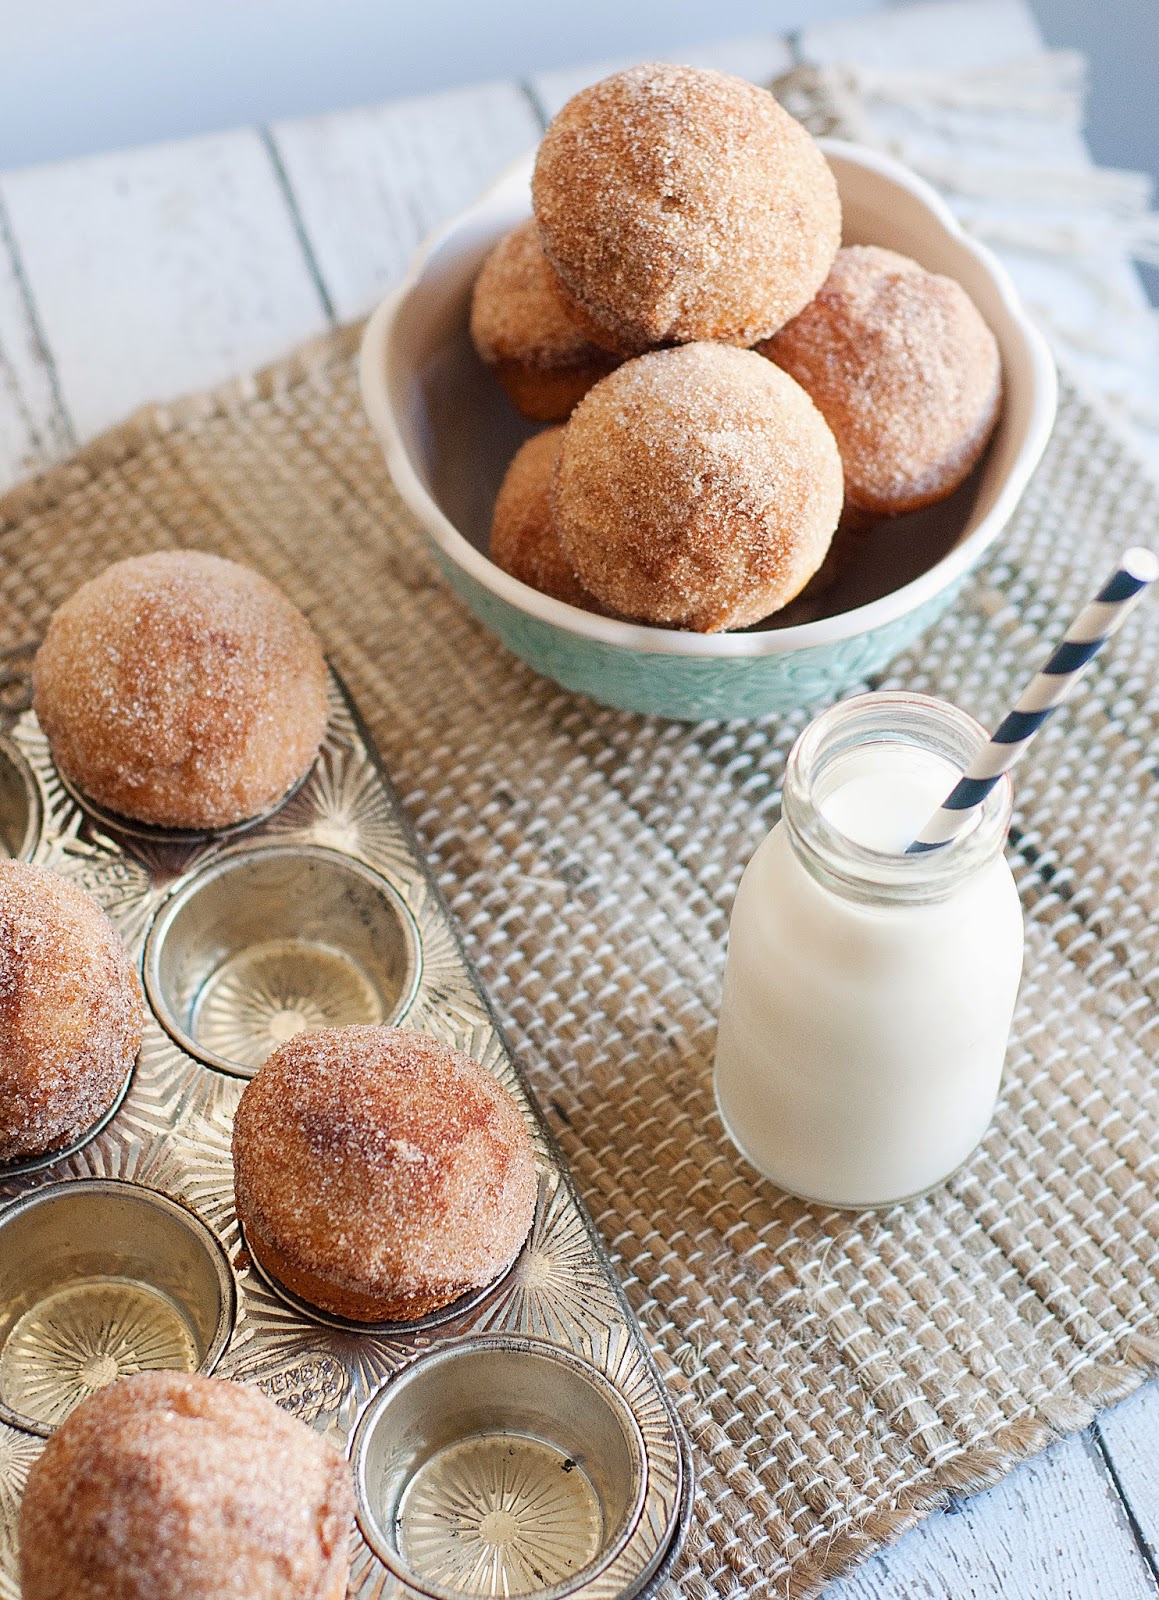
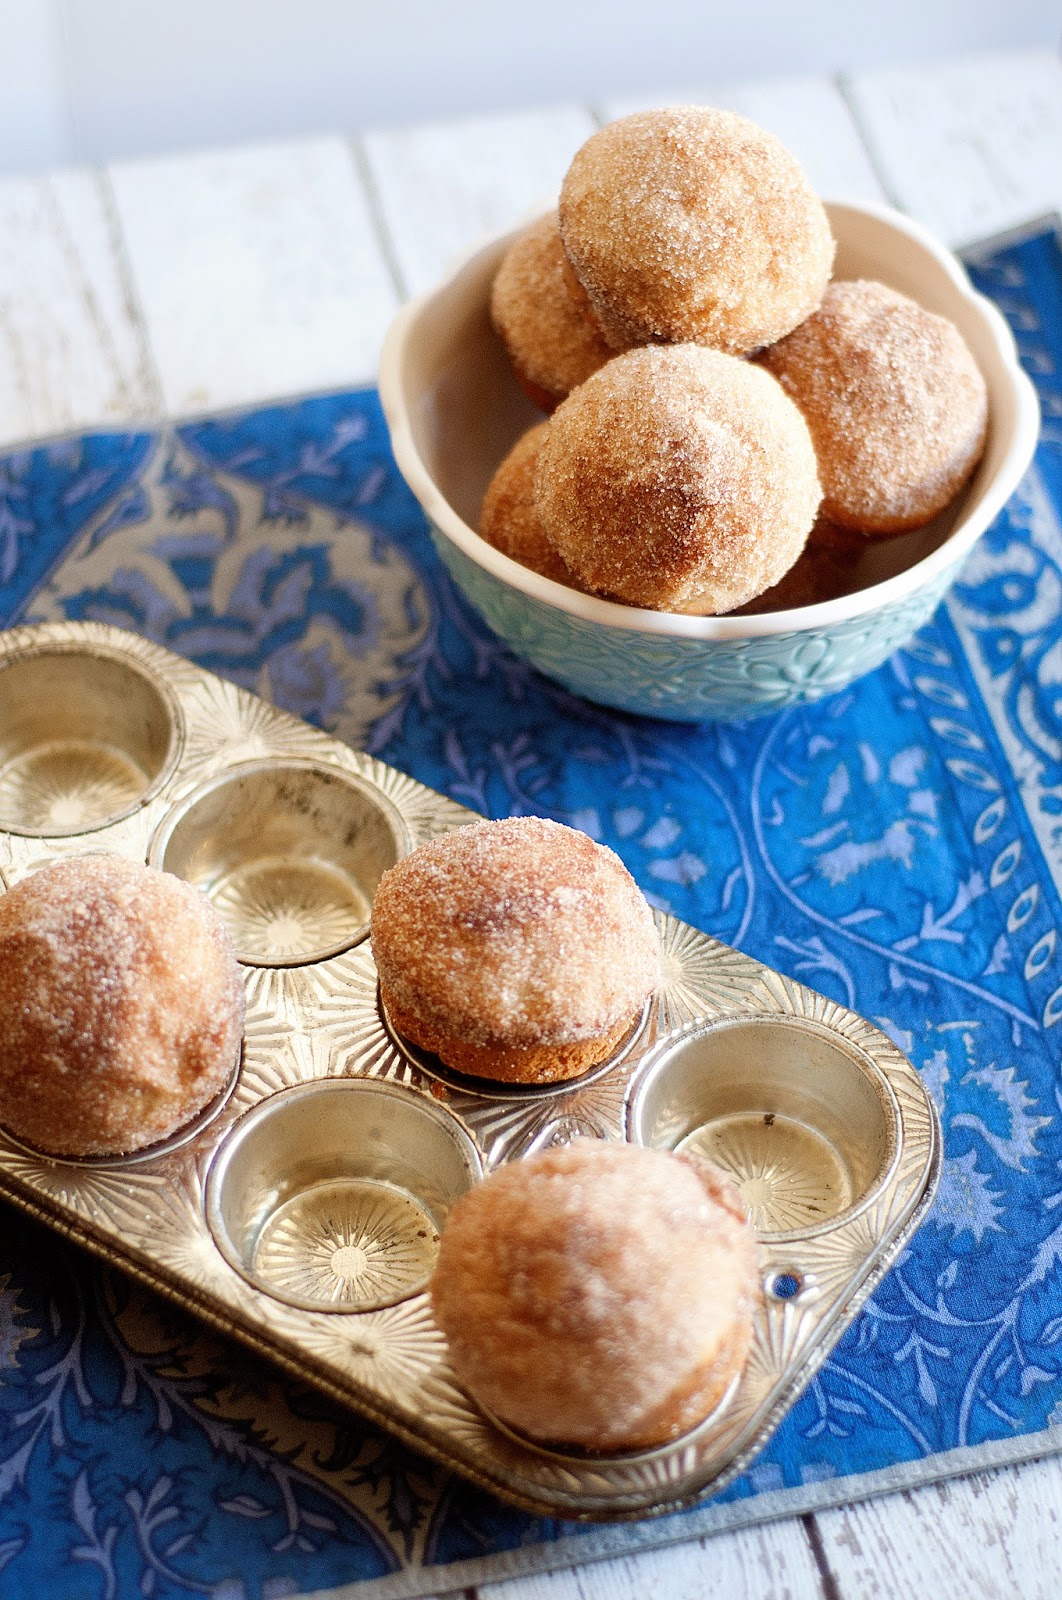
So, I took my favorite brownie recipe and stuffed it full of pumpkin spice cheesecake, and I am here to share it with you! That's right, buttery, delicious, chocolatey brownies perfected with pumpkin spiced cheesecake. Hello Thanksgiving dessert! Not only is the cheesecake swirled on top of the brownie, but it also get sandwiched inside the brownie itself. Y.U.M!


I hope your  fall has been delightful and productive. Mine sure has. New job, new stuff, Jesus is good. Let's get right to the recipe ok?


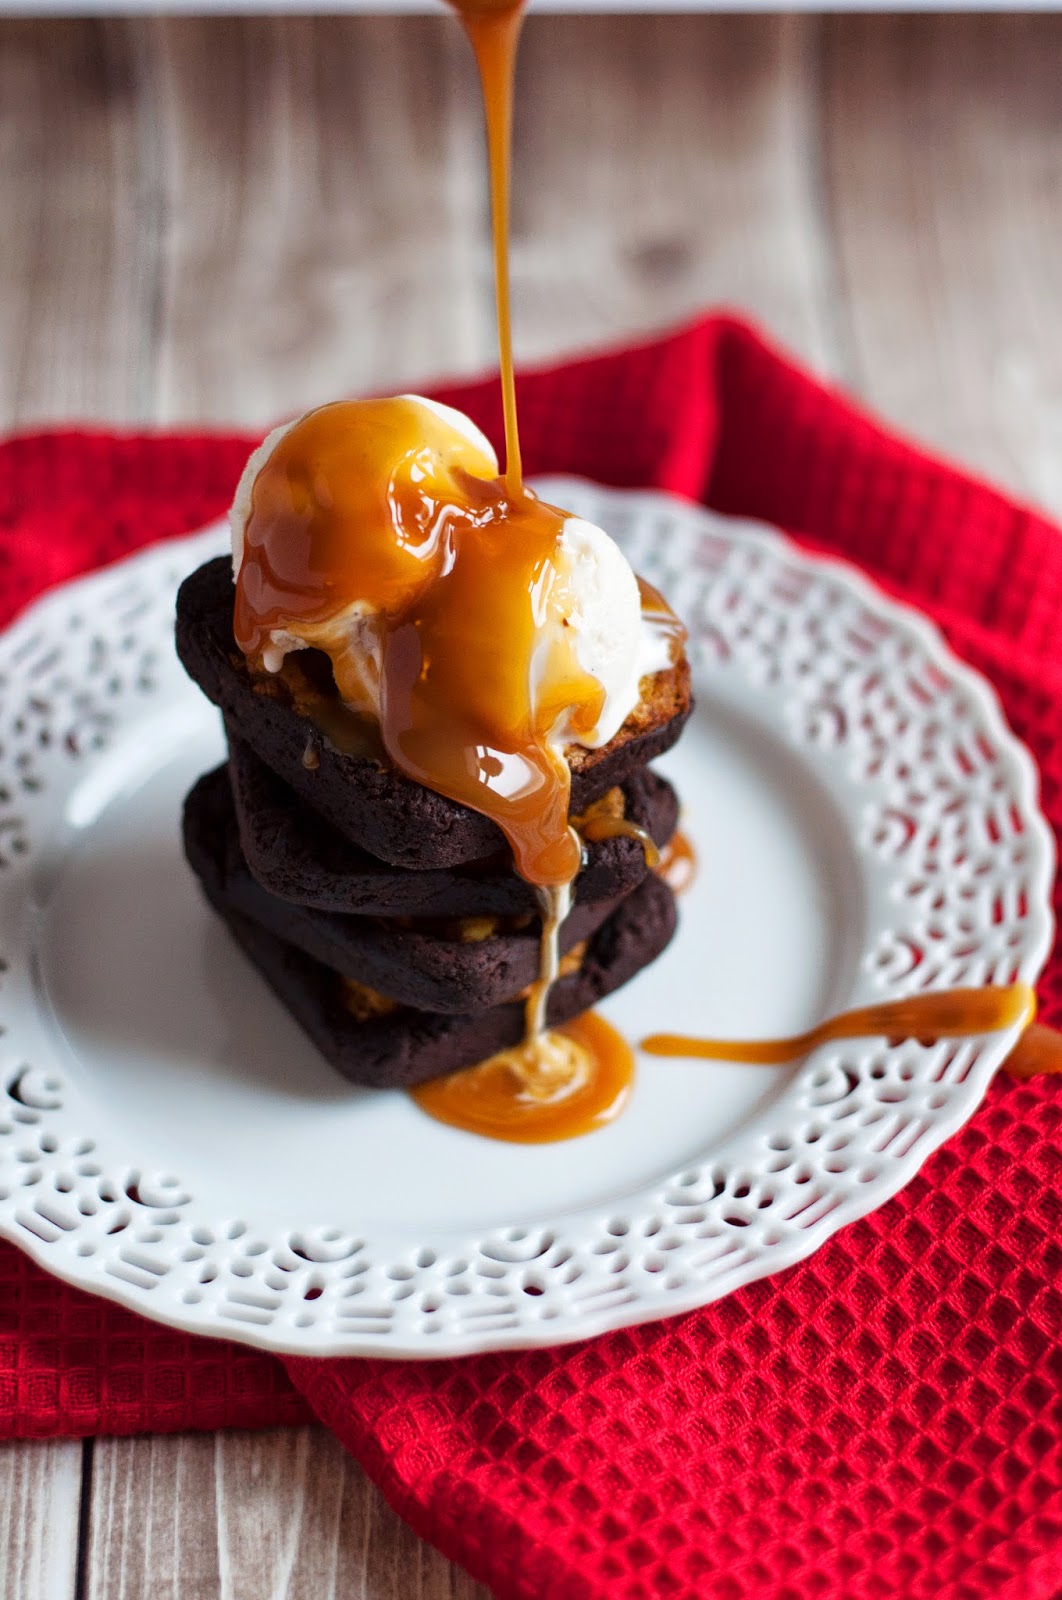
Pumpkin Spice Cheesecake Swirl Brownies


recipe adapted from Baked Occasions 

makes 24 bars


For the Pumpkin Spice Cheesecake

8 ounces cream cheese, softened
1/4 plus 2 tablespoons sugar
3/4 cup pumpkin puree 
1 large egg yolk
2 tablespoons flour
1 teaspoon cinnamon
1/4 teaspoon nutmeg
1/4 teaspoon ginger

In the bowl of a stand mixer, mix together the cream cheese and sugar until smooth and very creamy. Add in all the remaining ingredients and mix until well combined and smooth. Refrigerate while you make the brownie batter!


For the Brownies

3/4 cup plus 2 tablespoons flour
1 tablespoon unsweetened cocoa powder
1/2 teaspoon salt
8 ounces dark chocolate (I always use these)
1 1/2 sticks unsalted butter, cubed
3/4 cup sugar
1/4 cup plus 2 tablespoons light brown sugar
3 large eggs, at room temperature
1 teaspoon vanilla extract

Preheat oven to 350 degrees and position rack in the center of your oven. Butter the bottom and sides of a 12 cup individual brownie pan** (what I used).

In a medium bowl, whisk together the flour, cocoa, and salt. Set aside.

In a double boiler, melt together the chocolate and butter. Once melted and smooth, turn off the heat and add both sugars. Remove bowl from the pan (the chocolate mixture should be room temperature) and add two of the eggs. Whisk until combined. Add in the remaining egg and gently whisk in until combined.

Sprinkle flour over chocolate mixture and fold in just until combined. 

Fill each individual brownie cup 2/3 full, top with just under a tablespoon full of cheesecake, top with enough brownie batter to cover the cheesecake. Once all cups are full, take around a teaspoon full of cheesecake and dollop over each brownie. swirl a few times with a knife.

Bake 20-25 minutes or until a toothpick in the center comes out with a few moist crumbs. 

Let cool and devour. 

Notes:
These need to refrigerated to keep them fresh.

**If you don't have an individual brownie pan, you can use a 9-by-13-inch glass baking dish. Pour 2/3 of the brownie batter into the pan and smooth the top. Top the batter with the cheesecake mixture and smooth the top. Drop the remaining batter over the cheesecake, and swirl. Bake for 30-40 minutes. 

Friday, October 24, 2014

apple cider caramel sauce

Today we're talking happy accidents of the food variety. Last week my fabulous and trusty GPS took me to Ohio. However, it took me on all the backroads (aka Route 50) instead of the main road and, good thing for google maps, I loved every second of that drive. I saw corn fields with fruity pebble mountains in the background, prop planes splashed against a perfectly crisp fall sky, and the best thing of all, a 24-hour family owned donut shop in a little town called Londonderry that has been in existence for nearly 100 years! Talk about a happy accident! Those donuts were perfect and cheap. I got two for 98 cents. Ninety. Eight. Cents. I thought the lady was kidding me. I'm glad she wasn't. I want to move into that place. 


This caramel sauce? Also a happy accident! I was attempting to make these apple cider caramel candies and for some reason could not get them to set. The flavors were too good just to throw the caramel out, so I just warmed it up and used it as a warm sauce. This sauce is apple cider, caramelized sugar, and butter goodness. Make it right now!


Warm Apple Cider Caramel Sauce

adapted from this recipe from Dessert for Two

2 cups apple cider
4 tablespoons unsalted butter
3/4 cup brown sugar
3 tablespoons heavy cream
1/4 teaspoon cinnamon
3/4 teaspoons salt

In a small saucepan, boil cider until reduced to 1/4 cup. 

Once reduced, remove from heat and whisk in the butter, sugar, and heavy cream. Raise heat and bring mixture to 255 degrees.

Immediately stir in cinnamon and salt and pour mixture into a mason jar. Allow to cool before storing in the fridge. Serve on ice-cream, or these donuts

Have a great weekend everybody!


Thursday, September 25, 2014

French Breakfast Puffs

Today's high temperature was 65 degrees, it's officially fall, and i'm sharing a cozy recipe that's filled with warm spices and comforting sugar. We're talking french breakfast puffs people. Let's get to it!


So, what is a french breakfast puff? They are perfectly spiced little muffins that have a sturdy yet tender texture and the most perfect cinnamon-sugar crunch to balance out the crumb!

These little gems are probably one of the best baked goods I've made in a while. They are just SO FALL, and they are easy business!


In my weekend daydream, I'm eating these in my sunlit breakfast nook alongside a hot apple cider. Let's make that happen! Ok?

French Breakfast Puffs

makes about 10 little muffins
recipe slightly adapted from The Kitchy Kitchen Cookbook by Claire Thomas

5 1/3 tablespoons unsalted butter, softened
1 cup sugar, divided
1 egg
1 1/2 cups flour
1 1/2 teaspoons baking powder
1/2 teaspoon sea salt
1/4 teaspoons ground nutmeg
1 1/2 teaspoons cinnamon, divided
1/2 cup milk
1 teaspoon vanilla extract
4 tablespoons unsalted butter, melted

Preheat oven to 350 degrees, and prepare a muffin tin by spraying with non-stick spray.

In the bowl of a stand mixer, beat 1/2 cup of sugar and butter until light in color and fluffy. Add egg, and mix until fully incorporated. Sift together flour, baking powder, salt, nutmeg, and 1/2 teaspoon cinnamon. Mix the dry ingredients into the butter and sugar alternately with the milk. Add in vanilla, and mix to fully incorporate.

Fill muffin tin cups 2/3 cup full. Bake 25 minutes, or until barely golden brown.

Remove from oven and immediately remove puffs from the muffin tin. While still warm, dip puffs in the melted butter then roll in a mixture of the remaining sugar and cinnamon. 

Eat. Share. Have one with a hot apple cider it's the perfect fall breakfast!


Thanks for reading, you sweet people!

Thursday, September 18, 2014

Tortilla Soup

So, so, SO much to share since my last post. There's so much to say, but I will start with a "THANK YOU"! It's been a year since I began this blog and it's been a much needed creative outlet, but it's also brought some much needed successes. Thank you for reading, subscribing, sharing, and commenting. You are appreciated!


The next bit if news is, I'm starting a new job in October! If you know me in real life you'll know what a journey that situation has been. I've been desperate for a change for about 4 years and there has been A LOT of disappointment, feelings of rejection, tears, sleepless nights, and frustration. That's a story for another time, but I did want to write publicly about this blessing, and send encouragement your way if you're feeling stuck in a situation that you feel you have no control over. God is in control of your life. Just rest in His plan (even if it's difficult), and I promise that one day you'll look back and see that He had a perfect ending planned for you!

Now for the apology, I looked back and I haven't posted anything in 3 weeks?? Yikes! I'm truly sorry! It's been a bit crazy around here and I ended up having a cold/flu/weird, terrible sickness that lasted for two weeks. It was a real butt-kicker. And that, ladies and gentlemen is how this soup was created! 


This is tortilla soup, and it saved my throat and probably cured my head cold/flu/weird, terrible sickness. Maybe I should call this "Miracle Soup"?


This soup is incredibly easy, filling, and comforting....just what you need when you're feeling under the weather or chilled from the cooler temps. Chicken broth, diced tomatoes, jalapeños, cumin, and the unexpected addition of tortillas make a creamy soup that you'll be craving this fall!

Tortilla Soup

makes 2 quarts soup

1/4 cup olive oil
3 corn tortillas, chopped
2 cups yellow onion, diced
2 tablespoons ground cumin
1 teaspoon ground chipotle chile powder
1 jalapeño pepper, seeded and diced
5 garlic cloves, minced
1 quart reduced-sodium chicken broth
28 ounce can diced tomatoes

Heat oil in a large saucepan over medium-high heat. Add chopped tortillas and fry until crispy. 

Add onion, cumin, chile powder, jalapeño, and garlic. Cook until onions are tender and translucent.

Add broth and tomatoes and cooke over medium heat for 45 minutes. 

Puree soup in a blender and enjoy. You can eat this alone, or add whatever you like! I added grated cheese, cubed avocado, grilled chicken, and fried tortilla strips. 

recipe slightly adapted from The Kitchy Kitchen Cookbook by Claire Thomas


This soup and Vick's vaporub. Saved my life. :)

Friday, August 29, 2014

Triple Layer Funfetti Cake

Boy do I have a doozy of a creation for you today! Three layers of funfetti flavor stacked together and frosted with a sweetened whipped cream. Buckle your seat belts because here we go!

OK, so this cake has three layers. The first layer is a funfetti cheesecake, the second layer is a moist funfetti yellow cake, and the top layer is an airy funfetti mousse. That's right...cheesecake, regular cake, mousse, and it all gets finished off with sweetened whipped cream. It's impressive and delicious. So delicious in fact that we cut into this delight and I forgot to take photos of the inside. Just use your imagination. :)


This cake was a birthday treat made for my sister, Elyse, who is the funfetti-est person I know. She sent me a picture of a journal entry from middle school where she confessed that the hardest decision in her life was deciding what kind of birthday cake she wanted. Luckily this year, she didn't have to decide because I saw this creation and new it was perfect for her!

This cake is a bit labor intensive so make sure you give yourself plenty of time to make it. Also, you will need a springform pan. You can try to make this in a regular round cake pan, but I don't recommend it. :)

Triple Layer Funfetti Cake


For the Cheesecake

24 oz cream cheese
1 cup sugar
3 tbsp flour
1 cup sour cream
4 eggs
3-4 tbsp sprinkles
1 1/4 tsp almond extract
1 1/4 tsp butter extract

For the Funfetti Yellow Cake

2 cups Pillsbury Funfetti Cake Mix
4 tbsp vegetable oil
2 eggs
2/3 cup water

For the Mousse

1 tsp + 1/8 tsp powdered gelatin
1 1/2  tablespoon water
9 ounces white chocolate chips
2 1/4 cups cold heavy cream
1 tsp almond extract
1 tsp butter extract
4 tbsp sprinkles

For the Whipped Cream Frosting

2 1/2 cups heavy whipping cream
1 1/4 cups powdered sugar
1 1/4 tsp vanilla extract

Instructions


To make the Funfetti Cheesecake:

1. Preheat oven to 300 degrees. Line the bottom of a 9 inch springform pan with parchment paper and grease the sides.
2. In a large bowl, blend the cream cheese, sugar and flour. Use low speed to keep less air from getting into the batter.
3. Add the sour cream and 2 eggs. Beat until just combined.
4. Add other 2 eggs, sprinkles and almond and butter extracts. Beat until combined.
5. Pour the filling into the pan. Drop onto the counter a few times to release any air bubbles.
6. Wrap bottom of pan in aluminum foil and prepare it for a water bath.
7. Place foil wrapped pan in a another pan large enough for a water bath. Fill water pan with warm water about half way up the sides of the springform pan.
8. Bake for 1 hour and 30 minutes.
9. Turn off heat and leave in oven with door closed for 20 minutes or until set. Center of cheesecake will not look fully cooked, but will continue to cook in the oven.
10. Open oven door halfway and let cool for about 10 minutes. Cheesecake will be very tall, almost over the edge of the pan, but will begin to fall as it cools.
11. Refrigerate until firm 5-6 hours.
12. Remove cheesecake from springform pan to use later.

To make the Funfetti Cake:
1. Line the bottom of the same sized 9 inch springform pan used for the cheesecake with parchment paper and grease the sides.
2. Mix cake mix, oil and eggs together until well combined.
3. Pour into prepared pan and bake at 350 degrees for 20-25 minutes, or until a toothpick inserted comes out with a few crumbs.
4. Allow cake to cool for 5-8 minutes, then remove to cooling rack to cool completely.
5. When cool, remove cake dome from top of cake.

To make the Funfetti Mousse:
1. In a small bowl, sprinkle the gelatin over the water, let stand for about 5 minutes. Place mixer bowl and whisk attachment into the freezer for about 10 minutes.
2. Place the white chocolate chips in a medium bowl
3. Microwave 3/4 cup of heavy cream until it begins to boil.
4. Add gelatin mixture to the heavy cream and whisk until dissolved.
5. Pour cream over the white chocolate chips and let sit for about a minute.
6. Whisk until chocolate is melted and mixture is smooth. Set aside, cooling for about 5-8 minutes.
7. Take bowl out and whisk out of freezer and whisk remaining 1 1/2 cups heavy cream at high speed until it begins to thicken.
8. Add almond and butter extracts and continue whisking on high until soft peaks form.
9. Add about a third of the whipped cream to the chocolate mixture and mix well.
10. Add remaining whipped cream and sprinkles and mix until well combined. Set aside and move on to next steps.

To begin putting the cake together:
1. Prepare the same springform pan you used to make the cheesecake and cake. Put parchment paper on the bottom and around the edges, sticking up above the top edge of the pan.
2. Place the funfetti cake into the cake pan.
3. Pour the funfetti mousse on top of the funfetti cake and spread evenly.
4. Refrigerate until set, about 2 1/2 hours.

Once the mousse has set, make the Whipped Vanilla Icing:
1. Put mixing bowl and whisk attachment in freezer for about 10 minutes.
2. Remove bowl and whisk from freezer and whip cream on high until it begins to thicken.
3. Add vanilla extract and powdered sugar and whip on high until thick and creamy.

To finish off the cake:
1. Get funfetti cheesecake out of refrigerator, as well as the funfetti cake and mousse that are already layered together.
2. Place funfetti cheesecake on a cake board, or the plate you will service it on.
3. Remove funfetti cake and mousse layers from springform pan.
4. Spread a thin layer of icing on top of the cheesecake.
5. Place the funfetti cake and mousse layers on top of the cheesecake, using the cake to lift it. The cake should end up as the middle layer, with the cheesecake on bottom and the mousse on top.
6. Ice the cake with the remaining whipped icing. Decorate with additional sprinkles, if desired.
7. Refrigerate until ready to serve.


Friday, August 15, 2014

s'more nut bars


I have good news for you today, friends! It's still summer! August for me, and probably many of you, signals the beginning of fall. Summer is winding to a close, kids are headed back to school, and the summer activities fizzle out, but this year I'm determined to squeeze every last drop out of the summer season! In honor of that, we're talking the ultimate summer sweet - graham cracker, chocolate, and marshmallows - that's right we're doing classic s'mores in a whole new way!


When I came across this recipe, I was a little confused. First, what's a nut bar (besides being a really awkward name for a food), and second, how well would salty peanuts pair with graham cracker, marshmallow, and chocolate? Well folks, I'm here to tell you that these bars might be my favorite twist on a classic s'more awkward name and all! The saltiness of the peanuts and their crunchy bite perfectly round out the deliciousness that is this bar!


Ok, so these treats start with a graham cracker crust loaded with butter and the sweet flavor of brown sugar. Pressed into a pan and toasted to perfection, it's the most wonderful foundation for the remainder of the filling ingredients. Next up, a mixture of both dark and milk chocolate chips get stirred into a silky, shiny ganache. Fold in marshmallows and salty peanuts into the ganache and pour all of it onto the toasted crust. Finish these with a sprinkling of chopped peanuts and chill for several hours until set. These would be perfect for late summer parties, barbecues, and picnics since they're quick, easy, and yummy. You'll be everyone's favorite party guest. 


S'more Nut Bars

slightly adapted from Baked: New Frontiers in Baking Cookbook

18 graham crackers, crushed into fine crumbs
1 tablespoon firmly packed dark brown sugar
2/3 cup salted butter, melted
7 1/2 ounces milk chocolate chips
7 1/2 ounces dark chocolate chips
1 1/2 teaspoons light corn syrup
1 cup heavy cream
10 marshmallow, cut into fourths
1/2 cup lightly salted whole peanuts
1/2 cup lightly salted peanuts, chopped

Preheat oven to 300 degrees, and line a 9 x 13 inch pan with parchment paper. 

In a large bowl, combine graham cracker crumbs, brown sugar, and butter. Mix to combine then press into the bottom of the prepared pan. Bake crust for 15 minutes or until golden brown, fragrant, and toasted. Remove pan from oven and cool on a wire rack while you prepare the filling ingredients.

Place both types of chocolate in a heat-proof bowl and drizzle the corn syrup over the top. Set aside. In a small saucepan heat heavy cream until it starts to boil. Immediately pour the cream over the chocolate mixture and allow to sit for about 2 minutes. 

Starting at the center of the bowl, whisk chocolate mixture until it becomes smooth and shiny. Fold in the marshmallows and peanuts. 

Pour the chocolate filling mixture over the crust. Using a spatula, spread the mixture as evenly as possible and sprinkle with the chopped peanuts.

Chill in the fridge for at least 3 hours or until set. Cut into squares and serve. 

Bars will need to be kept in the fridge until ready to serve, and will stay fresh for up to 3 days as long as they remain tightly covered. 


Long live summer!

Thursday, August 7, 2014

cherry pie bars


Hi friends! Today we're talking pie, cherries, and flaky, buttery crust. Are you in? I hope you are because these bars are delicious. 


These bars start the way everything in life should start, with a buttery, flaky crust. Seriously, the crust of these bars might be everyone's favorite part. I'd guess it's because the foundation of these bars is loaded with butter, sugar, and lemon zest. How could you go wrong with that? Answer: you most certainly can't. 


The filling of these bars? Also delectable. It's a silky filling of eggs, sugar, greek yogurt, flour, and of course, cherries. Buttery, flaky crust topped with a silky filling and cherries? Sign me up!


Cherry Pie Bars

adapted from Annies Eats

For the Crust
1 1/2 cups cake flour
3/4 cups sugar
pinch salt
zest of a lemon
12 tablespoons unsalted butter, cold

For the Filling
1 cup sugar
2 large eggs
1/2 cup greek yogurt
6 tablespoons all-purpose flour
pinch of salt
juice of a lemon
1 teaspoon vanilla extract
16 ounces cherries, cut in half and pitted

Preheat oven to 350 degrees and prepare a 9x9 pan with aluminum foil.

Pulse flour, sugar, salt, zest, and butter in a food processor until crumbly. Reserve 3/4 cup of the mixture and set aside for the topping. Press the remainder of the crust mixture into the bottom of the prepared pan. Bake for 12 - 15 minutes or until bubbly and the edges are light golden. Let cool for 10 -12 minutes before adding the filling mixture.

Meanwhile in a large bowl, whisk together all filling ingredients except the cherries. Mix until smooth and creamy then gently fold in the cherries. 

Pour filling mixture over cooled crust and top with the reserved topping mixture. Bake for 45 minutes or until bars are just set and topping is just beginning to brown. Cool completely. Bars should be chilled for a few minutes before being sliced. 

Thursday, July 31, 2014

caramel corn cupcakes

I blame these cupcakes on last week's weather. 


Last week was absolutely wonderful. The air was warm, but there was a crisp breeze to cut through all the humidity. Perfection. Plus, it seems like everywhere I went I smelled fried food and I automatically started craving fall. 


I love summer, but I'm definitely ready for football games, crunchy leaves, apple desserts, pumpkin lattes, bath and body works candles, and craft fairs. For me, fall is all about caramel and I always equate the season with caramel corn. I guess it's because the scent is so warm and inviting. All these things inspired me to put the flavors of caramel corn into a cupcake. 


So, these cakes start with boxed white cake mix, but we aren't going to follow the directions on the back of the package. We're adding whole eggs instead of egg whites, salted butter in place of oil, and substituting milk (with a little something extra) for the water. My goal was to make the cake itself taste more salty, buttery, popcorn and top it all off with a sweet puff of caramel-y frosting. Mission accomplished thanks to a few tricks!


Caramel Corn Cupcakes

makes at 24 cupcakes

For the Cake

1 16.5 ounce box Duncan Hines Classic White Cake
3 large eggs
1 cup milk
1/4 cup salted butter, melted
2 cups caramel corn plus more for decoration ( I used Cracker Jack but homemade would be good too)
1/8 teaspoon butter extract
Pinch of salt


Preheat oven to 350 degrees. Put caramel corn in a large bowl and set aside.

In a small saucepan on medium-high, heat milk until tiny bubbles appear around the edge and immediately remove from heat. Pour scalded milk over the caramel corn and allow to steep and cool for about 10 minutes.

Once the milk is cool add it to the bowl of a mixer along with the cake mix, eggs, and melted butter.Mix until just combined and the cake mix is fully incorporated. Add in the butter extract and salt. Mix until just combined.

Spoon batter into 24 lined cupcake tins and bake for 13 - 15 minutes. Or until a tooth pick inserted in the center comes out clean.

Allow to cool for about 5 minutes before removing cupcakes from the pan and cooling completely on wire racks.  


For the Frosting

2 sticks butter
3 - 4 cups powdered sugar
1/4 cup caramel (either store-bought or homemade)
Pinch of salt

In the bowl of a stand mixer cream butter on medium speed. Once the butter is light and fluffy add powdered sugar, one cup at a time, mixing completely before adding more. Add in caramel and salt and mix until well combined. Turn mixer on higher and whip until frosting is light and fluffy. 

Pipe frosting onto cooled cupcakes and top with caramel corn and more caramel if you want!


Bring on the apple pie floats!

Thursday, July 24, 2014

roasted peaches with walnut crumble

It's officially SUMMER, and you know what that means....peaches! Today I'm sharing my go-to summer dessert - roasted peaches topped with salted caramel ice-cream and a brown sugar walnut crumble - on Oh the Lovely Things! This dessert is so easy and is perfect for summer parties or as the perfect ending to a simple summer dinner. 


This recipe is so simple and starts with roasted peaches. If you haven't started roasting your fruit, jump on the bandwagon immediately! It's so simple and brings out all the flavors of your favorite fruit. Once the peaches are roasted to perfection they get topped with the most delicious crumble made with walnuts, butter, cinnamon, and brown sugar. I'm convinced that brown sugar, cinnamon, and peaches should never be parted. After you try this recipe, you'll be convinced of that too!


After the peaches are roasted and topped with the walnut crumble the whole dessert gets finished with salted caramel gelato. You could totally skip the gelato, but please don't! The salty caramel rounds out the flavors perfectly!


I was so excited to be contacted by Clemence since her blog is full of beautiful things and lots of inspiration. Head on over to Oh the Lovely Things to see the recipe!